Extending responsiveGrid using React in AEM SPA Architecture | AEM 6.5.5

As the topic itself elaborate on what we will be handling in this article now.
During my AEM SPA implementation I encountered one issue where I needed something like column control in SPA architecture. But as you know earlier we used to have HTL rendered component, so it was easy to handle the division and crating a parsys inside parsys.
But as we are using SPA architecture we should have all rendering at React end.

Let’s understand how we can achieve the same thing in current SPA architecture.

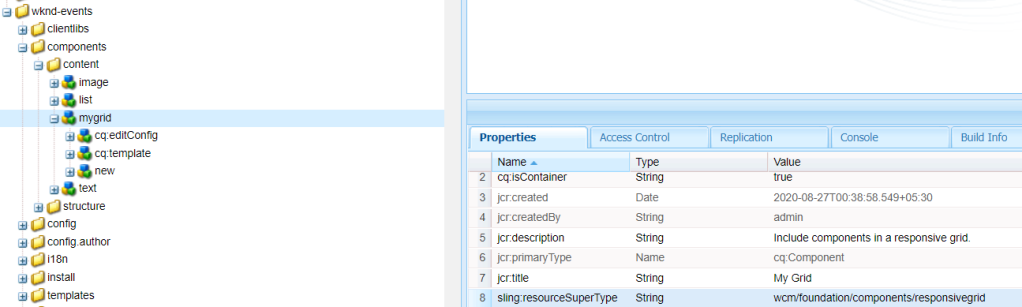
Create a basic AEM component under your project structure let’s say /apps/mycompany/content/components/mygrid with resourceSupertype as wcm/foundation/components/responsivegrid. (overlaying)

AEM responsiveGrid overlayed component.


Now we start with creating our corresponding React component inside ../react-app/src/components/MyGrid/Mygrid.js

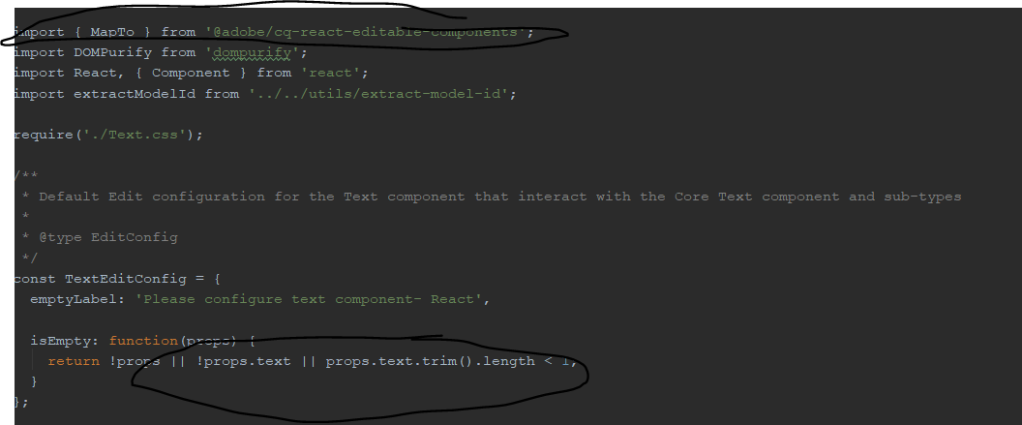
I have used the following JS and CSS to extend the ResponsiveGrid class from @adobe/cq-react-editable-components.

MyGrid.js

import React, { Component } from "react";
import {ResponsiveGrid, MapTo, withComponentMappingContext} from "@adobe/cq-react-editable-components";

require('./MyGrid.scss');

export class MyGrid extends ResponsiveGrid {
    /**
     * The attributes that will be injected in the root element of the container
     *
     * @returns {Object} - the attributes of the container
     */
    get containerProps() {
        let containerProps = super.containerProps;
        containerProps.className = (containerProps.className || '') + ' MyGrid ' +  this.props.gridClassNames;
        return containerProps;
    }

    render() {
        return (
            <div {...this.containerProps}>
                { super.childComponents }
                { super.placeholderComponent }
            </div>
        )
    }

}

MapTo('wknd-events/components/content/mygrid')(withComponentMappingContext(MyGrid));

MyGrid.scss

@import '../../styles/shared';

.MyGrid{
    padding: $gutter-padding;
    width: 50%;
    p {
        color: $color-white;
    }

    &-message {
        color: $color-primary;
    }

}


Also place the following SCSS files at ../react-app/src/styles

shared.scss

@import './variables';

//Mixins

@mixin media($types...) {
    @each $type in $types {

      @if $type == tablet {
        @media only screen and (min-width: $small-screen + 1) and (max-width: $medium-screen) {
          @content;
        }
      }
  
      @if $type == desktop {
        @media only screen and (min-width: $medium-screen + 1) {
          @content;
        }
      }

      @if $type == mobile {
        @media only screen and (min-width: $mobile-screen + 1) and (max-width: $small-screen) {
          @content;
        }
      }
    }
  }
  
  @mixin content-area () {
    max-width: $max-width;
    margin: 0 auto;
    padding: $gutter-padding;
  }

  @mixin component-padding() {
      padding: 0 $gutter-padding !important;
  }

  @mixin drop-shadow () {
    box-shadow: 0 4px 8px 0 rgba(0, 0, 0, 0.2), 0 6px 20px 0 rgba(0, 0, 0, 0.19);
  }

variables.scss

//Typography
$em-base: 20px;
$base-font-size: 1rem;
$small-font-size: 1.4rem;
$lead-font-size: 2rem;
$title-font-size: 5.2rem;
$h1-font-size: 3rem;
$h2-font-size: 2.5rem;
$h3-font-size: 2rem;
$h4-font-size: 1.5rem;
$h5-font-size: 1.3rem;
$h6-font-size: 1rem;
$base-line-height: 1.5;
$heading-line-height: 1.3;
$lead-line-height: 1.7;

$font-serif: ‘Asar’, serif;
$font-sans: ‘Source Sans Pro’, sans-serif;

$font-weight-light: 300;
$font-weight-normal: 400;
$font-weight-semi-bold: 600;
$font-weight-bold: 700;

//Colors
$color-white: #ffffff;
$color-black: #080808;

$color-yellow: #FFEA08;
$color-gray: #808080;
$color-dark-gray: #707070;

//Functional Colors

$color-primary: $color-yellow;
$color-secondary: $color-gray;
$color-text: $color-gray;

//Layout
$max-width: 1200px;
$header-height: 80px;
$header-height-big: 100px;

// Spacing
$gutter-padding: 12px;

// Mobile Breakpoints
$mobile-screen: 160px;
$small-screen: 767px;
$medium-screen: 992px;


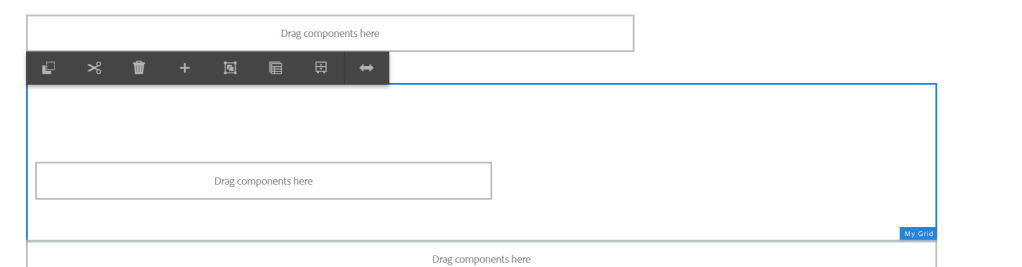
Once you are done with above changes deploy the code in AEM and drag and drop the component on SPA page. Below is the final snap of the component that’s created. We can customize the react code to add more responsiveGrid as well and arrange them in Horizontal order.

Responsive Grid SPA component


Comment or DM me in case of any clarification or update on the article.

Shortening of URL using etc/map

Hello all AEM folks!!

As most of the time in our project implementation we somehow end up shortening the URL, So that the whole link or the path is not publicly available and also shorten URL looks pretty decent.

Lets start with the step by step setup of our shorten URL internal redirect URLs.

First of all we get only http folder inside /etc/map. So if we make any changes will only work in our local instances as most of the time our higher environments are https.

So, just verify your higher environments and make the changes.

1. Create a https (sling:Folder) under /etc/map, just parallel to the http.
2. Now create a node(sling:Mapping) under /etc/map/https.
3. We need to play around two properties now i.e. sling:Match and sling:InternalRedirect

sling:match : This is the string pattern that we will match with the requested URI.
sling:internalRedirect : This is the string pattern where we want to target or redirect the requested URI.

Below is a example where I am loading a page without .html and removing /content/mycompany

Once you publish this configuration then we can see the changes getting reflecting in publish instance.

Try using https.publish if you are setting up this etc mapping for the publish URLs.

Removing .html and Shortening


Comment below or DM me for any clarification.

Resolve dependencies by converting Jar to Bundle | AEM 6.5.5

Many a times we come across such scenarios when we have to use some dependencies which are not resolved by our AEM server. In that case our project bundle doesn’t gets resolved and we see the dependency errors marked in red.

org.apache.oltu.oauth2.client,version=[1.0,2) — Cannot be resolved

In this case we will download the dependency Jar from the maven repository and convert it into OSGI bundle and deploy it to the AEM server.

Process to convert Jar to Bundle:
1. Go to File –> New –> Other –> Plug-in from existing JAR Archives

Click next and the add the JAR that we downloaded using the option Add External JAR and click next and provide the following configuration as per the requirement. And then click next and finish.

Now go to MANIFEST.MF file and remove the version from the imported packages as shown below.

Remove versions


Now switch to Runtime tab and click on add in Export packages column to add the packes and dependency that we want to export as part of this bundle. These are the same dependencies which were not getting resolved as bundle.

Exporting packages

Don’t forget to save the changes after updating the MANIFEST.MF file.

Now right click on the plugin project created in package explorer and click on Export and select Deployable plug-ins and fragments

Now provide the path where you want to save the deployable bundle locally and click on finish. Now go to the specified location and you will find the deployable bundle.

Installing directly on felix console is not the best way to resolve the dependency so we will deploy it as part of embed code.

Now create a install folder in your local code-base at ../apps/<project-name>/install/<Bundle.jar>
And now embed the code in ui.apps POM.xml

<embedded>
<groupId>org.apache.solr</groupId>
<artifactId>solr-solrj</artifactId>
<target>/apps/<project-name>/install</target>
<embedded>


Now when the code is built, this bundle gets deployed on the felix console and when we go and check the dependency it will be resolved as our project bundle is now importing the dependency from the created bundle’s exported packages.

AEM SPA (React) Project setup and component integration walk through | AEM 6.5.5

Rating: 4 out of 5.

In this article we will setup our AEM SPA project using the archetype 23.
Use the below maven command to create your AEM project and then follow the setup procedure to import in your IDE for further development.

mvn -B archetype:generate \
 -D archetypeGroupId=com.adobe.granite.archetypes \
 -D archetypeArtifactId=aem-project-archetype \
 -D archetypeVersion=23 \
 -D aemVersion=cloud \
 -D appTitle="My Company" \
 -D appId="mycompany" \
 -D groupId="com.mycompany" \
 -D frontendModule=general \
 -D includeExamples=n

Provide frontendModule as react, as we are building a SPA project with react implementation. We will get the corresponding folders applicable for react along with our AEM code folders.

Folder structure after build

Now we can start creating the components in AEM and rendering will be handles by the react end.

React components are placed at ..\ui.frontend\src\components and we have Text OOTB component which is integrated to the AEM component, mapping is done through MapTo parameter in the JS file.

It is mapped to Text component of AEM

Similarly we can create our own react component and Map it to a AEM component and list it in the import-components.js file present inside the components folder in react.

It imports the library in react which enables us to access the Aem component variables in react as props. And this done using sling model, where we expose these parameters in form JSON usinf JSON exporter.

Props fetched and library used

Below is the code snippet that we can use to generate the JSON using sling model that can be used to provide the props to the react component for rendering.

@Model(adaptables = SlingHttpServletRequest.class, adapters = {
        ComponentExporter.class }, resourceType = Title.RESOURCE_TYPE, defaultInjectionStrategy = DefaultInjectionStrategy.OPTIONAL)
@Exporter(name = ExporterConstants.SLING_MODEL_EXPORTER_NAME, extensions = ExporterConstants.SLING_MODEL_EXTENSION)
public class Title implements ComponentExporter {


    public static final String RESOURCE_TYPE = "mycompany/components/content/title";

    @ValueMapValue
    private String title;
 
    @Override
    public String getExportedType() {
        return RESOURCE_TYPE;
    }

    public String getTitle() {
        return title;
    }
}

Important point here is that the language page i.e en.html should be created with Root template and the child pages should use the content template. The reason being all the JSON gets loaded at the page which we define as the root page.
So, if you open any page under /content/mycompany/us/en it will load us.model.json
And it will have whole JSON of the site loaded at once.
To verify that you can expand the :children property and can see the JSON of all the childpages under en page.

Try creating some pages under /content/mycompany/us/en and try redirecting between the pages, you will notice that there no page load and content loads really fast.

NOTE : If your page is not loading then check for the :path variable, as this should match with the URI that you are hitting in the browser. In earlier archetype we had something called HierarchyPageImpl.java to handle this :path parameter by making changes to the getExportedType function.


Article on migration from AEM 6.4 to AEM 6.5.5 is in progress, subscribe and follow and get the updates through email for new topics.


Reference : AEM Archetype Adobe

COVID-19 Tracker using API calls in India | AEM 6.5.5

Hope you all are doing good!!
In this article we will see how we can implement a COVID-19 Tracker in AEM Server. I have used the open source Postman API’s to get the latest State and District wise data.

I have used below APIs to get the data related to COVID-19 in India
1. State & District wise API to get the data based on State and District.
2. Raw data of Infected people to get details of each and every person got infected due to COVID-19
3. Total State wise Data to get the increase in the cases everyday and tested people report in India.


To get the response of one of the API is have used Postman to study and analyse the data and filter out what is required.

API response for Chandigarh using API 1


Data of infected people in India using API 2
Daily cases count response using API 3

This API can be handled in AEM servlet or Java class to get the response in AEM and filter out the data which is required for the implementation to create a dashboard in AEM pages.

I have used the below code snippet to get the response in form of JSON and later fetched the data which was required to be displayed on the dashboard.

HashMap < String, Object > serviceParam = new HashMap < > ();
serviceParam.put(ResourceResolverFactory.SUBSERVICE, "writeSystemUser");

try (CloseableHttpClient httpClient = HttpClients.createDefault(); ResourceResolver resolver = resolverFactory.getServiceResourceResolver(serviceParam)) {
   
    HttpGet getRequest = new HttpGet("https://api.covid19india.org/state_district_wise.json");

    /* Headers can be added if accessing other available APIs */

    HttpResponse httpResponse = httpClient.execute(getRequest);
} catch {}

We can also implement rapid-api to get more filtered data based on different query parameters. In this API we need to pass some Header parameters like x-rapidapi-host and x-rapidapi-key.